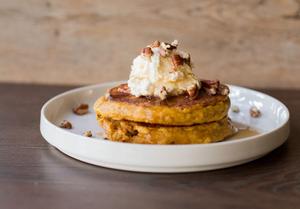
• Skip to primary navigation
  • Skip to main content
  • Skip to footer
  • Chilean
    • Chilean Appetizers & Beverages
    • Chilean Breads
    • Chilean Breakfast
    • Chilean Cakes & Bakes
    • Chilean Cookies & Candy
    • Chilean Desserts
    • Chilean Jams & Jellies
    • Chilean Meat
    • Chilean Pasta, Rice & Potatoes
    • Chilean Poultry
    • Chilean Salads
    • Chilean Seafood
    • Chilean Soups & Starters
    • Chilean Vegetables
  • Savory
    • Breakfast
      • Eggs
    • Appetizers
      • Cocktails
    • Entrees
      • Beef
      • Empanadas (EN)
      • Chicken
      • Fish
      • Pork
      • Shellfish
    • Side dishes
      • Pasta
      • Rice
      • Potatoes
    • Vegetables
    • Salads
    • Sandwiches (en)
    • Soups
    • Breads
  • Sweet
    • Cakes & Bakes
    • Candy
    • Chocolate
    • Cookies
    • Cupcakes
    • Desserts
    • Jam, Frosting & Jellies
    • Pies
    • Sweet bread

Pilar's Chilean Food & Garden

A recipe blog by a Chilean living in the USA

  • Houston Gardening
  • Español
  •         
  •           

Sweet bread

Chilean Calzones Rotos

December 9, 2013 by Pilar Hernandez 43 Comments

Versión en español

Chilean Calzones RotosCalzones Rotos is a classic winter Chilean recipe. Fun fact: the name, when translated, means “broken underwear.” Now, I don’t know why we call them this, but maybe some questions are better left unanswered. My grandmother made these treats a lot, and it always felt like something special. When we would arrive to her house for a winter visit and she wanted to spoil us with something delicious, often Calzones Rotos were chosen.

Here in Houston, we just had our first cold days of the season, and I could not resist the temptation to make them. My kids had never eaten them but immediately claimed them to be new favorites. The orange or lemon zest is essential. The thickness depends on personal preference, my husband likes them thick, and I prefer them thinner and crispy.

Other traditional winter treats in Chile, besides Calzones Rotos, include:

  • churros
  • sopaipillas
  • picarones
  • pear empanadas

Chilean Calzones rotos

Print
clock clock icon cutlery cutlery icon flag flag icon folder folder icon instagram instagram icon pinterest pinterest icon facebook facebook icon print print icon squares squares icon heart heart icon heart solid heart solid icon
Chilean Calzones Rotos

Chilean Calzones Rotos

  • Author: Pilar Hernandez
  • Prep Time: 30 minutes
  • Cook Time: 20 minutes
  • Total Time: 50 minutes
  • Yield: 30 1x
  • Category: Sweets
  • Method: Fried
  • Cuisine: Chilean
Print Recipe
Pin Recipe

Description

A delicious fried pastry.


Ingredients

Scale
  • 3 cups all-purpose flour
  • 1/2 cup powdered sugar
  • 1  1/2 teaspoon baking powder
  • 60 grams of soft butter
  • 1 egg
  • 2 egg yolks
  • 1 tablespoon pisco, rum or vodka
  • grated zest of 1 lemon or 1 orange
  • pinch of salt
  • water (4 tablespoons)
  • oil for frying

Instructions

  1. In a bowl, sift the flour with the powdered sugar and baking powder. Add salt. Fluff with a fork.
  2. Add butter, egg yolks, egg, pisco, zest. Mix well with a wooden spoon or mixer with paddle. Add water 1 tablespoon at a time until it forms a firm dough.
  3. Spread on a lightly floured counter, should be of a thickness of about 3-5 mm.
  4. Cut the dough into rectangles about 10x4cm (it is easiest to use a pizza cutter) Then with a knife, make a slit or cut at the center and thread a corner inside the slit and stretch gently.
  5. Heat the oil to 350F or 180C.
  6. Fry pastries 6-8 at a time for 2 minutes. Turn and fry for 1 more minute.
  7. They should be golden brown, remove to a platter covered with a paper towel and sprinkle with powdered sugar immediately.
  8. Serve with hot chocolate.

Recipe adapted from the book Popular Kitchen by Mariana Bravo Walker


Keywords: Calzones rotos, chilean cuisine

Did you make this recipe?

Tag @chileanfoodandgarden on Instagram and hashtag it #chileanfoodandgarden

Calzones rotos paso a paso Chilean Calzones Rotos
Chilean Calzones Rotos

Chilean Calzones Rotos

Pin202
Share56
Tweet
258 Shares

Filed Under: Chilean Cookies & Candy, Chilean recipes, Popular Posts, Sweet bread, Sweet treats

Chilean Christmas Cake

November 29, 2013 by Pilar Hernandez Leave a Comment

Versión en español

Christmas Cake, Chilean RecipeA recipe sent by Rosa, a follower of the blog on Facebook. Thank you, Rosa! She does this Chilean Christmas cake every year, the recipe is originally from an old, long out of print Chilean magazine called Eva?(scroll down for the rest of the article in English).

Christmas Cake, Chilean Recipe

4 loaves
Ingredients:

  • 1 kilo of flour (2 pounds)
  • 1 teaspoon cinnamon
  • 1 teaspoon powdered cloves
  • 1/2 teaspoon freshly grated nutmeg
  • 1/2 teaspoon anise powdered, optional
  • 250 grams of powdered sugar
  • 14 grams or 2 packets granulated instant dry yeast
  • pinch of salt
  • 1 cup chopped almonds
  • 1 cup ground walnuts or almonds
  • 1 cup chopped walnuts
  • 1 cup raisins
  • 1 cup chopped candied fruit
  • 2 tablespoons of beer
  • 250 grams of melted butter
  • 3 eggs
  • 200 ml. of warm water
  • 1 egg to paint

Preparation:

  1. In a bowl mix almonds, raisins, nuts, candied fruit, and ground almonds.
  2. In a large bowl mix the flour, sugar, cinnamon, salt, cloves, nutmeg, anise, and yeast. Stir with a fork until well blended.
  3. In another medium bowl, mix melted butter and beer, eggs. Beat with a fork until well blended.
  4. Make a volcano and put the butter mixture in the center. Stir with a wooden spoon to mix or knead all. Add the warm water and knead to form a uniform dough, it will be heavy, but not sticky. You can use the mixer or food processor for this.
  5. Let stand covered with a cloth in a warm draft-free place for 2 hours or until doubled in size.
  6. Remove the dough to a floured counter and pound with your hands to make a rectangle, place the mixture of nuts, raisins and candied fruit on the center, roll and knead until incorporated and evenly distribute.
  7. Cut the dough into 4 equal parts and make rolls/buns with each.
  8. Preheat oven to 300F or 150C.
  9. Place the buns on a baking pan covered with parchment paper and let rise for 15-30 minutes.
  10. Cut a triangle on top of each bun and brush with beaten egg, sprinkle with sugar if desired.
  11. Bake in preheated oven for 1 hour and 30 minutes or until golden.
  12. Cool on a wire rack. Storage in sealed bags.

Christmas Cake, Chilean Recipe

Pin35
Share11
Tweet
46 Shares

Filed Under: Cakes & Bakes, Chilean Cakes & Bakes, Chilean recipes, Sweet bread, Sweet treats

Pumpkin Pancakes

November 1, 2013 by Pilar Hernandez Leave a Comment

Versión en español

Pumpkin PancakesWe are in full pumpkin season here in the southern USA and I love to use pumpkin puree in soups, risottos and of course on sweet things like pies, pumpkin butter or Cheesecake. Here, they are a breakfast meal, but for me, they are more like a quick bread to eat with a cup of tea.

I love them with maple syrup, whipped cream, and chopped nuts as pictured. If you have never made pancakes I recommend you do, is fast and they always work.

Pumpkin Pancakes

Ingredients:

  • 1 1/ 4 cup all-purpose flour
  • 2 teaspoons baking powder
  • 1/2 teaspoon cinnamon
  • pinch of nutmeg, cloves
  • 1/4 teaspoon salt
  • 4 tablespoons brown sugar
  • 1/2 cup pumpkin puree
  • 1 cup milk
  • 1 egg
  • 2 tablespoons vegetable oil

Preparation:

  1. In a bowl mix the flour, baking powder, cinnamon, nutmeg, cloves, and salt, stir a few times with a fork.
  2. In another bowl mix milk, pumpkin puree, eggs, oil, and sugar. Whisk with a fork until well blended.
  3. Pour the dry ingredients over the wet and stir just enough to mix the two and get a heavy batter.
  4. Heat a griddle. Little oiled.
  5. Place 1/2 cup batter and let cook a couple of minutes, they are ready to flip when you start seeing bubbles burst on the surface. Flip and finish cooking. They should be golden.
  6. Serve with butter, whipped cream, maple syrup, ice cream to your liking.

Pancakes de zapallo Pumpkin Pancakes

Pin
Share
Tweet
0 Shares

Filed Under: American food, Breakfast, Squash, Sweet bread, Sweet treats

Dulce de Leche Roll

May 31, 2013 by Pilar Hernandez 12 Comments

Versión en español

Dulce de Leche RollThis recipe is long overdue, but I had tried different recipes for the jelly roll and didn’t do it for me. Not soft enough. But, when I read this recipe in the excellent blog Kanela y Limón, I thought this is it! And I was right. The difference: no baking powder.

I found this Dulce de Leche Roll very easy to make, roll and fill. 100% recommended. I double the recipe to make 2. I filled one with lemon cream and the other with dulce de leche and coconut in the traditional way in Chile.

Maybe you also like this recipe: Dulce de Leche Mousse.

Print
clock clock icon cutlery cutlery icon flag flag icon folder folder icon instagram instagram icon pinterest pinterest icon facebook facebook icon print print icon squares squares icon heart heart icon heart solid heart solid icon
Dulce de Leche Roll

Dulce de Leche Roll

★★★★★ 4.7 from 3 reviews
  • Author: Pilar Hernandez
  • Prep Time: 30 minutes
  • Cook Time: 20 minutes
  • Total Time: 50 minutes
  • Yield: 10 1x
  • Category: Sweets
  • Method: Baked
  • Cuisine: Chilean
Print Recipe
Pin Recipe

Description

A perfect adittion to a dessert table. Spongy and sweet.


Ingredients

Scale
  • 50 grams of milk (by weight)
  • 50 grams of canola oil (by weight)
  • 4 eggs
  • 70 grams of sugar, 20 and 50 separately
  • 80 grams of all-purpose flour
  • pinch of salt
  • 1 can of dulce de leche, I used La Lechera, easy to find on Latino markets
  • coconut and icing sugar to decorate

Instructions

  1. Preheat oven to 325F or 160C.
  2. Cover the baking sheet with parchment paper. You can use a standard jelly roll pan or a half sheet pan.
  3. Using two separate large bowls, in one place eggs whites and a pinch of salt, on the other yolks, 20 grams of sugar, milk, oil, and flour with a balloon whisk mix well until it looks like a batter.
  4. Beat egg whites until they are white, add sugar and beat until a soft peak meringue (see photo).
  5. Mix both carefully.
  6. Pour the batter into the prepared baking pan. Spread in an even layer.
  7. Bake for 15-18 minutes until golden.
  8. Remove from the oven and turn onto another sheet of parchment paper. Peel off the paper on top and roll using the new paper. Allow cooling.
  9. When cool, unroll and spread the dulce de leche covering the entire cake. If it is thick and hard to spread, heat on medium in the microwave (out of the can) for 1 minute.
  10. Roll back and sprinkle with powdered sugar and coconut. Slice and serve.

Recipe from the blog Kanela y Limón


Keywords: dulce de leche roll, dessert

Did you make this recipe?

Tag @chileanfoodandgarden on Instagram and hashtag it #chileanfoodandgarden

Brazo de reina, receta chilena Dulce de Leche Roll

Dulce de Leche Roll

Pin72
Share4
Tweet
76 Shares

Filed Under: Cakes & Bakes, Chilean Cakes & Bakes, Chilean recipes, Sweet bread, Sweet treats

Meyer Lemon Scones

January 4, 2013 by Pilar Hernandez Leave a Comment

Versión en español

Meyer Lemon SconesThis is my favorite snack/breakfast at Starbucks, I change the flavor from vanilla to lemon and they turn up even more delicious. I really encourage you to try it.
You can freeze them for up to 2 months. Defrost on the counter, just allow enough time for the glaze to set again.

Meyer Lemon Scones

for 50 mini scones
Ingredients:

  • 3 cup all-purpose flour sifted
  • 1 tablespoon baking powder
  • 1/4 teaspoon salt
  • 2/3 cup sugar
  • zest of 1 lemon, I used Meyer
  • 175 grams cold unsalted butter
  • 1 egg
  • 3/4 cup heavy cream cold

Preparation:

  1. Mix the sugar with the lemon zest, stir well.
  2. In a large bowl mix the sifted flour, baking powder, salt and sugar with the lemon zest. Mix well.
  3. Add the diced butter and work with a fork until it looks like fine sand. Do not use your hands, or the butter will melt.
  4. In a small bowl mix the egg and cream, whisk until blended.
  5. Add the cream mixture to the flour mixture and work with a wooden spoon until it forms a soft dough.
  6. Spread over the floured counter, pat or roll until a thickness of 1 inch.
  7. Cut into squares and then into triangles. Freeze for 30 minutes (do not skip)
  8. Preheat oven to 350F or 180C.
  9. Place leaving 1″ in between on baking sheet (you may use Silpat or parchment paper or aluminum if desired).
  10. Bake for 13-15 minutes until lightly browned.
  11. Let cool for 5 minutes on the baking sheet, then move to a wire rack and let cool completely before applying the glaze.

For glaze,

  • 4 cups sifted powdered sugar
  • 1/2 cup lemon juice

In a medium bowl sift the powdered sugar, start adding the lemon juice stirring well with a whisk.
Dip each scone in the glaze. Let drip back into the bowl and then let dry for 2-3 hours on a grid (placed on a tray because it will leak).
Scones de limón Meyer Lemon Scones

Pin8
Share
Tweet
8 Shares

Filed Under: Sweet bread, Sweet treats

Strawberry Shortcakes

November 2, 2012 by Pilar Hernandez 1 Comment

Versión en español

Strawberry ShortcakesI’m sure these little guys they do not need an introduction, I love how they are in between a cookie and a sweet bread. But flexible enough to adapt to different fillings and fruits. I love doing this during the summer.

Visit our collection of Chilean recipes here.

Strawberry Shortcakes

for 12 shortcakes middle size or 20 cocktail size
Ingredients:

  • 2 cups all-purpose flour
  • 2 teaspoons baking powder
  • 1 teaspoon salt
  • 1 1/2 tablespoon granulated sugar
  • 8 tablespoons (115 grams) cold butter, cubed
  • 2/3 cup (160 ml) heavy cream
  • 1 yolk to paint the rolls
  • sweetened whipped cream and chopped fruit macerated for 2 hours in 1 tablespoon sugar

Preparation:

  1. Preheat oven to 200C or 400F. Prepare a baking sheet, cover with parchment paper or Silpat.
  2. Sift the flour, baking powder, salt and sugar in a medium bowl. Using 2 knives add the cold butter and work by “cutting” the butter and integrating it with the flour to make crumbs the size of a grain of corn or so. Add the cream and stir with a fork or spoon until blended only. If you continue to beat them you will end with hard shortcakes.
  3.  Knead lightly on a floured counter (20 seconds).
  4. Roll until dough is 2 cm thick and cut with a round cookie cutter. I used one of 3 cm in diameter, for use a medium round cookie cutter around 6cm. in diameter. Floured the cutter each time.
  5. Place the rolls in the prepared baking sheet and brush with the beaten egg yolk.
  6. Bake for 15-20 minutes or until risen and golden brown.
  7. Let it cool
  8. Halved and serve with whipped cream and fresh or macerated fruit or other sauce you like.

Recipe adapted from David Lebovitz
Strawberry Shortcakes

Pin
Share
Tweet
0 Shares

Filed Under: American food, Cookies, Sweet bread, Sweet treats

  • « Go to Previous Page
  • Go to page 1
  • Go to page 2
  • Go to page 3
  • Go to page 4
  • Go to Next Page »

Footer

Search

Copyright © 2021 Pilar's Chilean Food & Garden